
PlanXcel Add-in
Version 2.47.01
Download the MSI Setup File to automatically install the PlanXcel Add-in (Recommended - Admin Previlages required).
Run the PlanXcel_SetUp.msi setup file after closing all Excel files. Please follow the onscreen commands to complete the installation.
🛠️ How to Install the PlanXcel Add-in manually
Follow these steps to install and activate the PlanXcel Add-in for Microsoft Excel. No Admin rights are required to activate.
📦 Step 1: Prepare the Files
Extract the downloaded ZIP file to a local folder on your computer.
Close all open Excel files before proceeding.
🔐 Step 2: Unblock the Files
Even though our files are digitally certified, Microsoft may flag downloaded files with a security warning. To check:
Right-click each file and select Properties.
If you see the message:
“This file came from another computer and might be blocked to help protect this computer.”
→ Check the Unblock box and click OK.If no warning is shown, simply click OK to close the dialog.
📂 Step 3: Install the Add-in
Double-click the PlanXcel.xlam file from your local folder.
The file will install silently in the background — you may not see it open.
✅ Step 4: Activate the Add-in in Excel
Open Microsoft Excel.
If the PlanXcel tab is not visible in the Ribbon:
Go to File > Options > Add-ins > Manage (Excel Add-ins) > Go
(or click Excel Add-ins from the Developer tab)In the Add-ins window, check the box next to PlanExcel.
Click OK to activate.
🎉 Step 5: You're Ready!
A new tab named PlanXcel will appear in the Excel Ribbon.
You now have full access to all PlanXcel dashboard and scheduling tools.

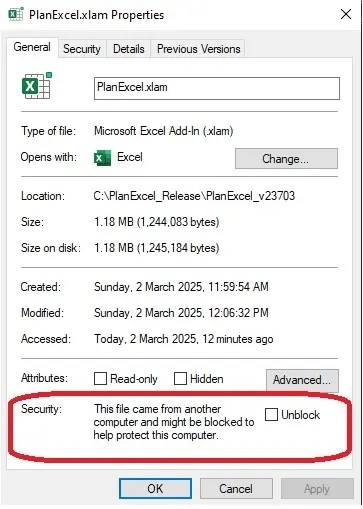
Check Unblock before proceeding for manual installation. It is recommended to check that this Unblock is checked to avoid any unnecessary issues with Excel.
Manual Installation
PlanXcel is completely free to download and try, giving you access to the full-featured version, not a limited demo.
Explore all dashboards, tracking tools, performance indicators, and reporting features exactly as professionals use them in real projects. The dashboard features are available directly inside the Excel Add-in, using familiar Excel functionality for filtering, analysis, and reporting.
PlanXcel now also includes a new Power BI export feature. With one export from PlanXcel, your project data can feed ready-to-use Power BI dashboards, allowing you to view key project insights, progress, performance, and productivity reports in one complete dashboard suite.
Experience how PlanXcel transforms Excel into a powerful planning and monitoring system that complements your existing planning solutions.
We are continuously enhancing PlanXcel with new features. The latest version also includes a built-in PMS, enabling you to create, monitor, and summarize scheduling activities as you go by defining work packages.
Download the latest version now and discover how much time and effort you can save.
PlanXcel is also listed on Softpedia, one of the most trusted global software distribution platforms.
Download from Softpedia for an additional layer of trust and verification.
Automatic Installation
If Admin previlages are not available, PlanXcel can be installed under the User profile. Download Zipped EXE Setup file and extract to your local folder. Run the PlanXcel_SetUp.exe setup file after closing all Excel files. This will install the PlanXcel Add-in to the default Addin folder but may not be activated which can be done by following the below note.
Note: If PlanXcel ribbon is not seen (in some rare cases) in the Excel menu, follow the below step after opening any Excel workbook.
File >> Options >> Addins >> Manage (Excel Add-ins) >> Go OR Excel Ribbon >> Developer >> Excel Add-ins
Tick the PlanExcel addin to activate .
MSI Installer
Windows Installer
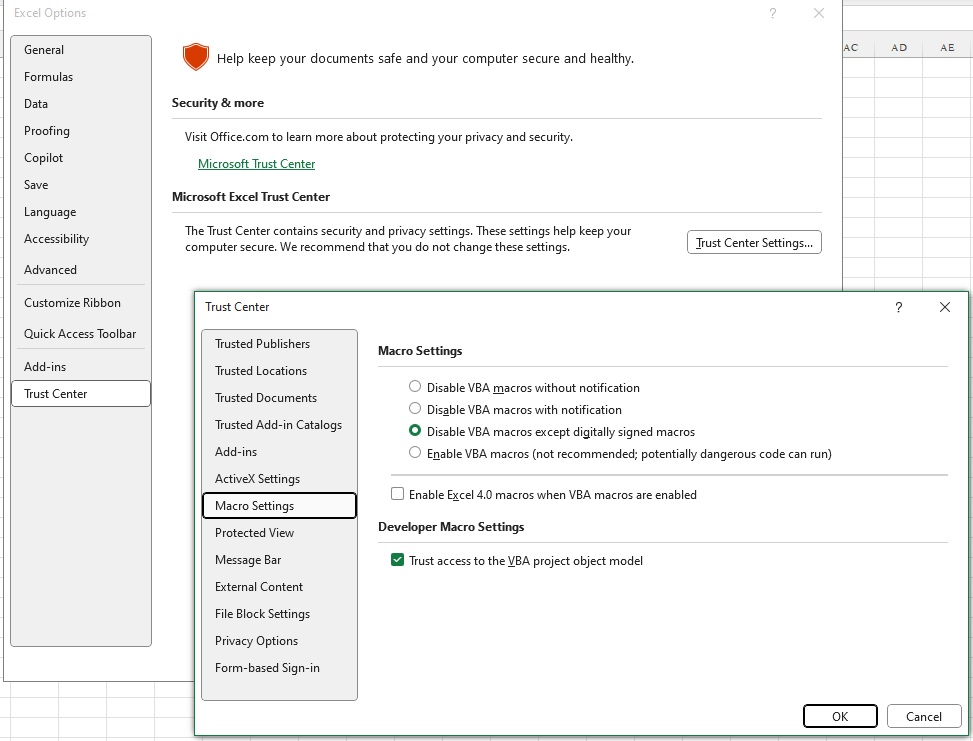
Macro Settings in Trust Center
Open Excel Options and Change the Macro settings to Disable VBA macros except digitally signed macros